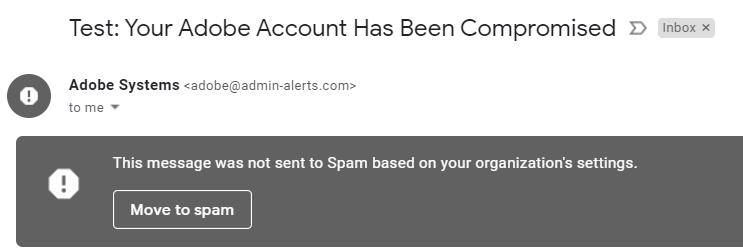
Is there a recommended config for setting up a G Suite domain for Security Awareness Training campaigns?  As it is now, I have whitelisted the IP address found in the documentation, but this doesn’t prevent G Suite from marking the simulation email with a big RED BANNER warning the user.  Would be nice not to have that happen for more effective training.


Yes, please check out “Part 2: Add Webroot’ IP addresses as Inbound Gateways” in the G Suite whitelisting guide below to prevent Google banners from appearing in your user's inbox when they receive a simulated phishing test from Webroot. We are currently updating our documentation. If you message me your email address I can send you this as a PDF with screenshots.


How to Whitelist by IP Address in G Suite/Google Apps

  • Webroot IP Address and Mail Server
  • Securecast IP Address –167.89.85.54
  • Securecast Mail Server – o1.relay.mx-secure.com (o1.relay.mx-secure.com x167.89.85.54])

The below instructions will show you how to whitelist Webroot’ simulated phishing emails and training notifications by IP address in your G Suite environment. This method of whitelisting is a two-part process:

Part 1: Add Webroot' IP addresses to Email Whitelist

This is the recommended setting if you do not have a cloud-based spam filter in front of G Suite. If you do have a cloud-based spam filter, you should whitelist us by our IP addresses in the filter, and whitelist by header in G Suite.

We recommend setting up a test phishing campaign to yourself or a small group after you follow the below steps to ensure your whitelisting was successful. The setting may take up to an hour to propagate to all users, so wait at least an hour before testing.

1. Log in to https://admin.google.com and select Apps.

2. Select G Suite.

3. Select Gmail.

4. Select Advanced Settings.

5. In the Organizations section, highlight your Domain (Not an OU).

Note: G Suite does not allow whitelisting by IP Address for individual OUs, only the entire domain.

6. In the Email whitelist section, enter our IP addresses separated by commas.

7. Scroll to the bottom and click Save. The setting may take up to an hour to propagate to all users.

Part 2: Add Webroot’ IP addresses as Inbound Gateways

This method of whitelisting is to prevent the following Google banners from appearing in your user's inbox when they receive a simulated phishing test from Webroot

  1. Log in to your Google Admin Console.

  2. Navigate to Apps > G Suite > Gmail > Advanced Settings.

  3. Under General Settings, select your top-level organization (typically your primary domain) on the left.

  4. Scroll down to the Inbound Gateway setting located under the Spam section. Hover over the setting and click the Edit button. This will open the Inbound gateway screen.

  5. Configure the Inbound gateway using the settings below:


  1. Gateway IPs
    Add the IP Addresses for Webroot.

  2. Leave the Reject all mail not from gateway IPs option unchecked.

  3. Check Require TLS for connections from the email gateways listed above.

  4. Message Tagging

    Enter text for the Spam Header Tag that is unlikely to be found in a PST email. This field is required. For example: “kzndsfgklinjvsdnfioasmnfroipdsmfs”

  5. Select the Disable Gmail spam evaluation on mail from this gateway; only use header value option.

  6. Click the SAVE button.


Hello Phil, I’ve configured our G Suite account per your instructions but I still receive the below banner. Is there a way to eliminate all warning banners? Thank you in advance for your support.


We are adding support for an additional whitelisting option, which seems to do the trick for this new G Suite banner. Will reply back in a couple of weeks with more detail when this is available.


Please see updated instructions for whitelisting in G Suite here: https://answers.webroot.com/Webroot/ukp.aspx?pid=12&app=vw&vw=1&login=1&solutionid=2939


Reply